FACTS Online - Client Application Manual
What is FACTS Online?
FACTS Online is a secure engagement and client portal software used by businesses across Australia and the world to interact with their clients digitally. The software is developed, hosted and supported in Melbourne, Australia. We retain control of 100% of our codebase, however our clients are owners of their data without exception.
Can I trust FACTS Online?
FACTS Online is developed and maintained in Australia with servers in both Melbourne and Sydney. The software complies with all Australian standards and regulations for data security and user privacy. The license holders own the data stored at FACTS Online (typically the business you interact with). For more details, see our Privacy Policy and Security Statements.
Getting Started 01: Account Invitation.
You will receive an invite to FACTS Online from the business. The invitation email verifies your email identity and allows you to create a password and access your account.
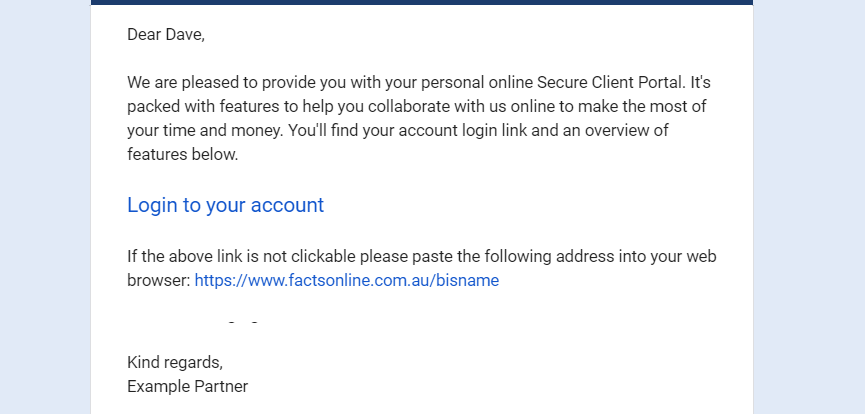
Step 1: FACTS Online Invitation Email.
- Open the invitation email you received from the business.
- Click "Login to your account".
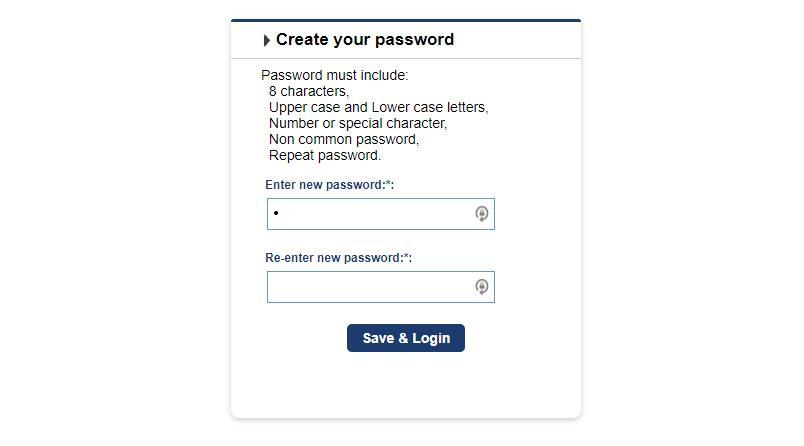
Step 2: Setup Your Password
- FACTS Online requires the following password strength features:
- Minimum 8 characters.
- Use of both Upper-case and Lower-case letters.
- At least one number or special character (@!?*).
- Non-common password. Check that your password is not on the Common Internet Password List.
- Enter password and repeat. Check that the password is valid (all green).
- Click Save & Login.
Step 3: Continue to Dashboard
Goto dashboard
Getting started 02: Signature Request.
You will receive a document signature request email. You can access the digital signature facility, sign documents, and access your account from this email.
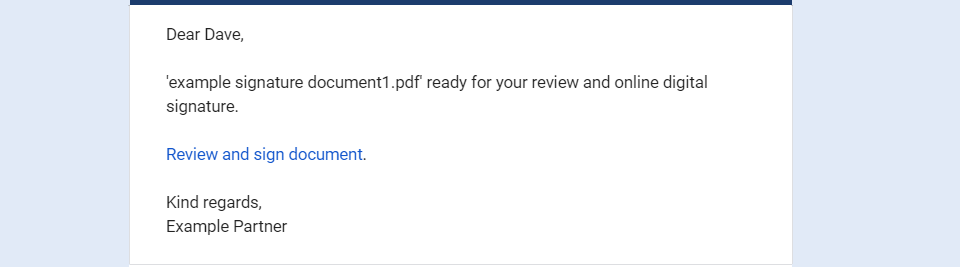
Step 1: Signature Request Email
- Open the invitation email you received from the business.
- Click "Review and sign document".
Step 2: Setup your Signature
- Select signature entry type: Draw (on-screen), Upload an image file or Select a predefined font.
- Enter your signature.
- Draw option: draw with a mouse or with a touch screen.
- Upload option: click upload or drag and drop an image file over the box.
- Selection option: select your preferred font option.
- Click "Next (Sign document)".

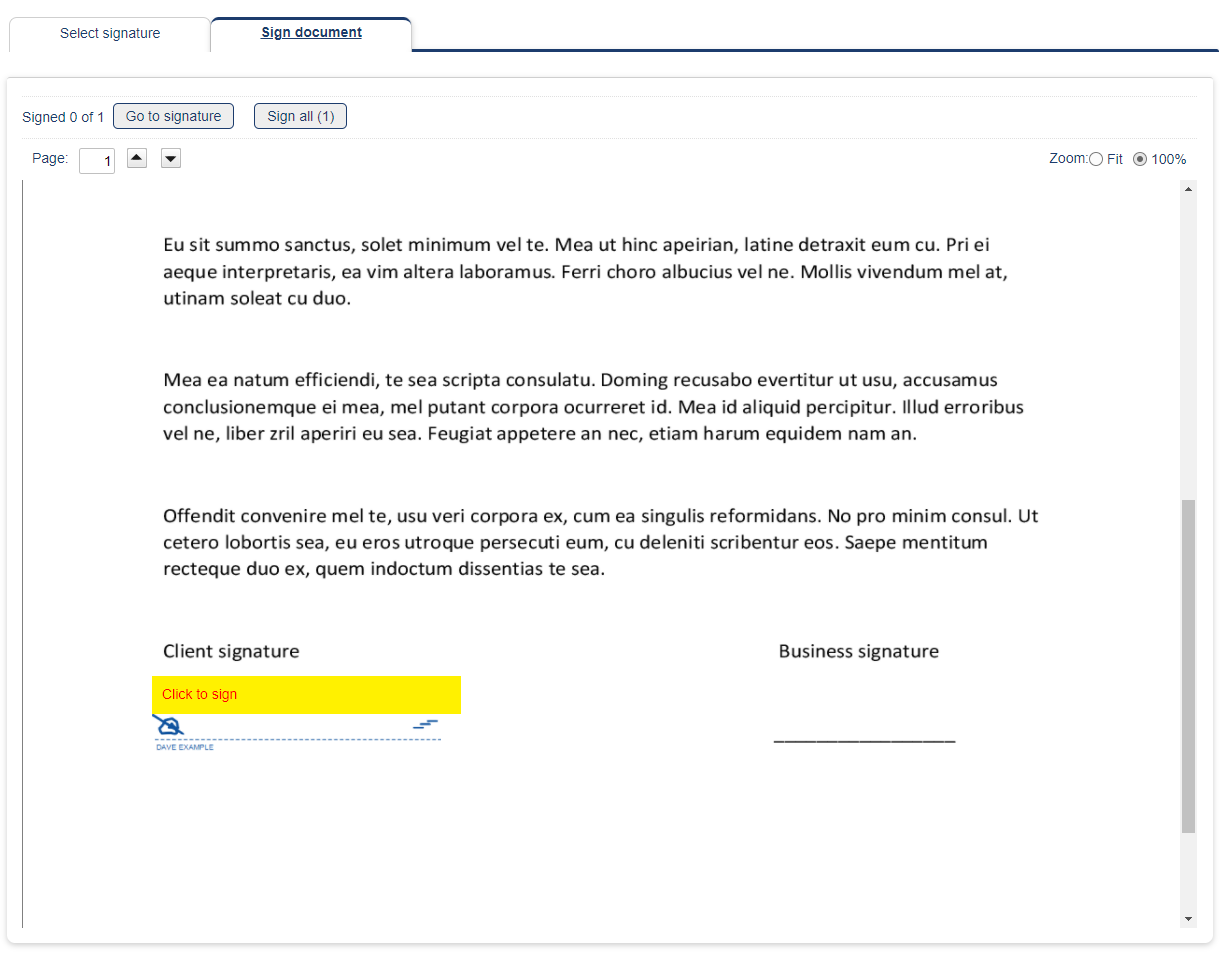
Step 3: Sign Document
- Review the document for your signature.
- Sign all locations marked with a Yellow "click to sign".
- The "Sign All" option will sign all remaining signature positions.
- Wait for your signature to complete and review your signed document. You may also download and print the signed copy.
- In case of multiple signature requests, click "Next document" and repeat the process.
Step 4: Access FACTS Online Secure Portal
- If you already have an account, click "Go to secure portal" and log in as usual.
- For first time users, click "Setup portal access".
- FACTS Online requires the following password strength features:
- Minimum 8 characters.
- Use Upper-case and Lower-case letters.
- At least one number or special character (@!?*).
- Non-common password. Check that your password is not on the Common Internet Password List.
- Enter password and repeat. Check password is valid (all green).
- Click Save & Login.
Client Dashboard
The client dashboard page is the secure portal homepage and contains shortcuts to the main areas of FACTS Online.
- Vault: All files, documents, and signature related actions.
- eForms: Electronic forms provided by the business.
- Message board: Notices from the business.
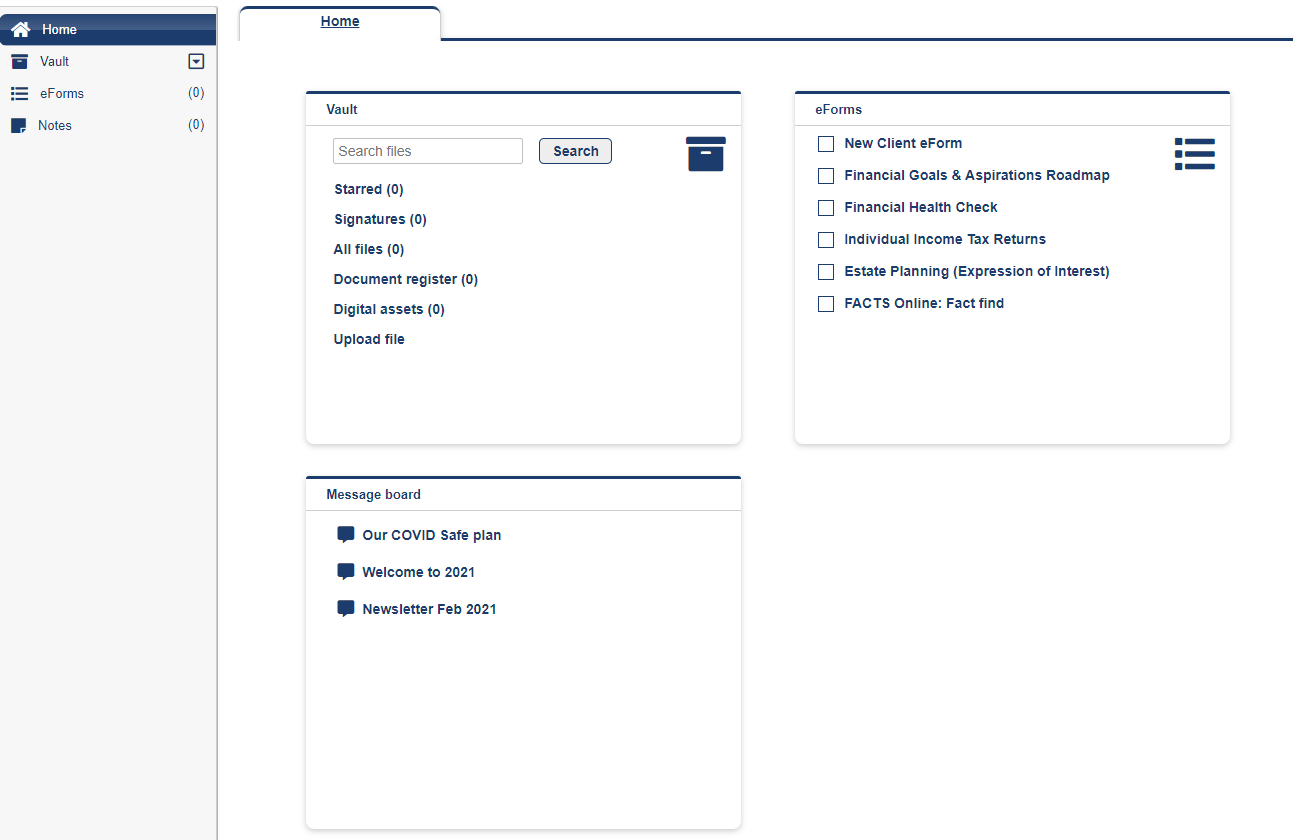
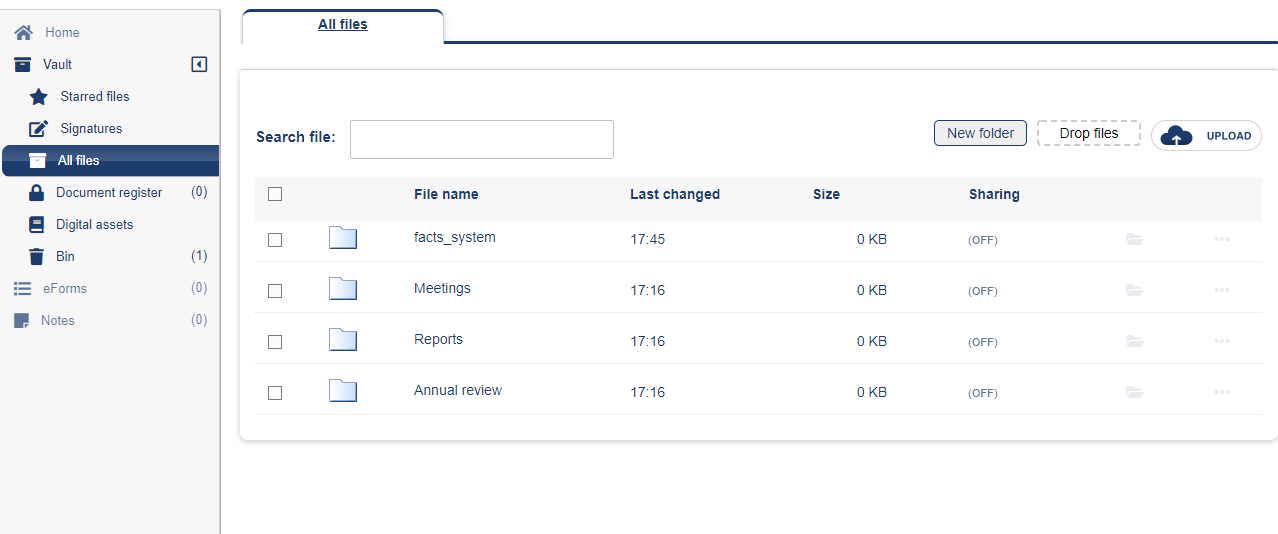
Vault
The FACTS Online Vault includes all files, documents, and signature related features. You can access Vault from the dashboard, the left menu, or the "hamburger" icon on mobile.
Key vault categories:
- Starred files: Files or documents marked as important by you or the business.
- Signatures: Documents requiring your attention and storage of your signed documents.
- All files: All files and folders uploaded by you or the business.
- Document register (optional): Structured files register managed by the business (view only).
- Digital assets: Documents and files shared by the business.
- Bin: Your deleted files (retained for 14 days after deletion).
Key Vault Actions:
Review and Download a File
Step 1: Sign in to FACTS Online
- Sign in from the business website or click a link on the file notification email received from the business.
- Use your FACTS Online credentials to log in.
Step 2: Find and Review a File.
- Click "Vault" on the left menu.
- Find the file by search or folder structure.
- Click the file name to view (Pdf/Word/Image/Video) or download (any other file).
Sign a Digital Signature Request
Step 1: Sign in to FACTS Online and Find Signatures.
- Sign in from the business website or click a link on the file notification email.
- Use your FACTS Online credentials to sign in.
- From the dashboard, Vault Panel, click "Signatures".
- Alternatively, click Vault on the left menu followed by "Signatures".
Step 2: Review Required Signatures.
- The Required signature page contains all documents awaiting your signature.
- Click a signature name to start the signing process.
Step 3: Setup your Signature
- Select signature entry type: Draw (on-screen), Upload an image file or Select a predefined font.
- Enter your signature.
- Draw option: Draw with a mouse or with a touch screen.
- Upload option: Click upload or drag and drop an image file over the box.
- Selection option: Select your preferred font option.
- Click "Next (Sign document).
Step 4: Sign Document
- Review the document for signature.
- Sign all locations marked with a Yellow "Click to sign".
- The ‘Sign All’ option will sign all remaining signature positions.
- Wait for a signature confirmation and review the signed document. You may also download and print the signed copy.
- Repeat the process until you sign all documents.
Upload a File.
Step 1: Sign in to FACTS Online.
- Sign in from the business website.
- Use your FACTS Online credentials to log in.
Step 2: Upload a File from the Dashboard.
- From the dashboard, Vault tile, click Upload file (last item).
- Select a file from your local device and click "Open" (Windows), "Select" (Mac).
- The system will send an automated upload notification to the business.
Step 3: Upload from Vault.
- Click Vault on the left menu.
- Click the Upload icon or drag and drop files from your device.
- The system will send an automated upload notification to the business.
Upload a Folder (Chrome only).
Step 1: Sign in to FACTS Online.
- Sign in from the business website.
- Use your FACTS Online credentials to sign in.
Step 2: Upload a Folder to Vault.
- Click Vault on the left menu.
- Drag and drop a folder from your computer (Mac or Windows).
- The system will send an automated upload notification to the business.
eForms
eForms are electronic forms provided by the business for you. eForms are submitted to the business and are used in handling your affairs. For example, new client form or income tax returns.
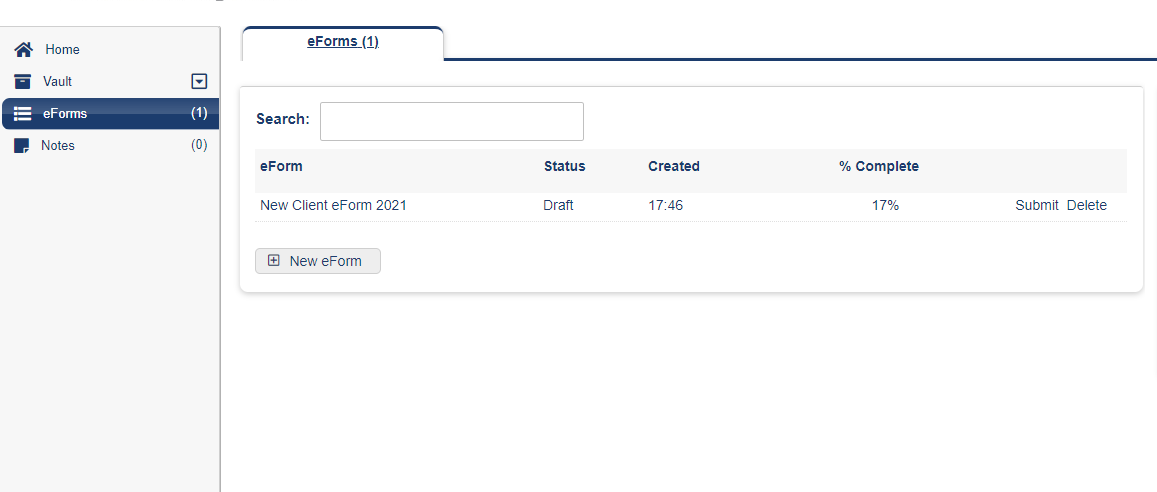
Start an eForm.
Step 1: Sign in to FACTS Online
- Sign in from the business’s website.
- Use your FACTS Online credentials to sign in.
Step 2: Start an eForm from the dashboard.
- From the dashboard, eForms tile, click the required eForm.
- The application will start a new eForm for you.
- Fill in the required details and click "Next" until the last page.
- Submit the form when completed.
Step 3: Start an eForm from the eForm tab.
- Click eForms on the left menu.
- Click "New eForm."
- Click the required eForm and "Start eForm."
- Fill up the required details and click "Next" until the last page.
- Submit the form when completed.
Notes
Notes are a secured communication channel between you and the business. The application creates notes as part of documents interaction, eForms and referral arrangement.
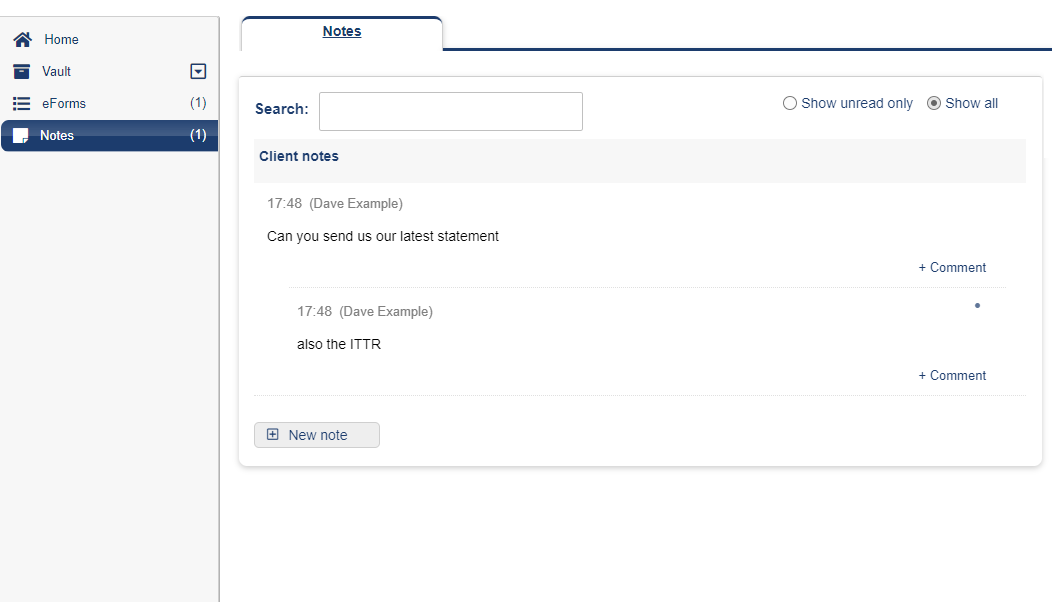
Create and Send a Note.
Step 1: Sign into FACTS Online.
- Sign in from the business website.
- Use your FACTS Online credentials to sign in.
Step 2: Send a Note.
- Click Notes on the left menu.
- Click "New note".
- Enter your note and click "Save".
Settings
The secure portal setting area contains your account setup, personal details, and digital signatures storage.
Primary settings areas:
- Account settings, including username and password.
- Personal details loaded by the business.
- Digital signature maintenance.
Contact Us
Contact your business operator at any stage from within the portal by clicking "Contact".
FACTS Online Technical Support
For technical support, click "Support" and enter the issue. A notice will be sent to the business and FACTS Online secure portal technical support.